Steps to the Volleyball Jump Serve
One of the most sought-after skills in volleyball is the jump serve (also known as the spike serve). Players with a powerful jump serve can completely change the outcome of a match. While the initial goal may be to get an ace, powerful jump serves often disrupt the opposing team’s timing making it more difficult to run their offense. So that begs the question; How do you jump serve?
The keys to the jump serve in volleyball are:
- Get in the zone
- Have a consistent toss
- Perfect your approach
- Make solid contact with full extension
- Follow through
What is a jump serve in volleyball?
Before we get into the steps of the jump serve, I think it’s important to have an understanding of what a jump serve is. A jump serve in volleyball is a type of serve in which the player leaves the ground and makes contact with the ball at a higher point in order to increase power and effectiveness. While it’s a difficult skill to master, players with a great jump serve can take control of matches.
The first player to popularize the jump serve technique was Renan Dal Zotto during the 1984 Olympics. Renan Dal Zotto is a former outside hitter of the Brazilian national team who’s revolutionary serve helped them take home the silver medal that year.
Now that we have that out of the way, let’s get into it. The first step to mastering the jump serve is mastering your mind! I know it sounds crazy but clearing your head is vital. Take a look below to get a better idea of what I mean.
Clear Your Head
The first, and arguably most important, step in a great jump serve is to mentally prepare yourself. Often times players will have some kind of routine (like bouncing the ball three times and then licking their fingers) just before they begin their jump serve.
Contrary to what you might think, this isn’t some kind of superstition. The goal here is to start the same way every single time in order to breed consistency. Great jump servers are consistent. You can’t be a great jump server if you only get the ball in play one out of ten times.
When you step back to the serving line, take a breath. Do your best to clear your head and visualize yourself serving exactly how you want it to go. Once you’re “in the zone”, start your routine. Your routine can consist of literally anything but it’s an extremely important step and should be done EVERY TIME! Don’t skip this step! Find a routine that works for you and put yourself in the same mental place prior to each serve.
The Toss
Now that you’re clear headed and ready to attack the volleyball, it’s time to actually start the jump serve. The first physical action of a jump serve is the toss. It’s important to note that many players might toss the volleyball differently so it really comes down to personal preference. With that being said, I’ll share the most commonly taught method.
I recommend starting about 10 feet behind the end line in order to give yourself enough room for your approach. If you’re right-handed, start with the volleyball in your right hand with your arm fully extended straight in front of you. As you take your first step (we’ll get into footwork a bit later) toss the ball forward and into the air so that if it were to land, it would land about two feet onto the court. The height of the volleyball depends on how quick you are in your approach so it will vary from player to player.
Release the volleyball as high as possible and flick your wrist upwards letting the ball roll off of the tips of your fingers. This creates topspin which greatly impacts the flight of the ball and could ultimately determine if your serve lands in or out.
Practice your toss until you can replicate it every time. The biggest mishap when it comes to jump serves are timing related so perfecting your toss is 100% necessary. A toss that’s too high or too low will surely mess up your timing and more than likely result in a service error.
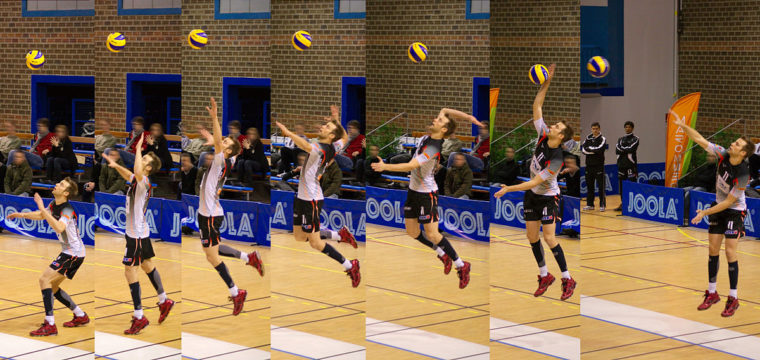
The Approach
The next stage of the jump serve is the approach. The jump serve approach is essentially the same as your hitting approach but instead of doing it at the net, you’re doing it behind the service line. Now you might be thinking, “why can’t I just toss the ball straight up and jump serve like that?”. The reason is that your approach will create momentum which in turn gets released into the ball at impact. This maximizes your power and increases the speed of the serve (making it much more effective).
The four-step approach begins with a small step with the right foot (if you are right-handed). This can be confusing, but do your best to match your right foot with your right hand. Feel the ball roll from the heal of your hand to the tips of your fingers in conjunction with your right foot going from heal to toe on that initial step. Once your right foot is off the ground and you’re making your second step, the ball should be out of your hand and in the air.
Your second step is much longer and keeps you on plane with your toss. As you make your third step, really try to explode onto your right foot. As you do this, throw your arms behind you in and bend at the waist. During your fourth and final step, swing your arms forward and use the momentum that you’ve created to propel your body into the air.
The Impact
Once you get the toss and approach down, you’re in good shape. Learning to jump serve can be super frustrating so it’s incredibly important that you work on the basics first. Now comes the fun part: contact!
As you launch yourself into the air, use your left hand as a guide while pulling your right arm back like a bow and arrow (similar to the logo of AVP). Once the ball comes down, move your guide arm and release your hitting arm creating power with your core. The most important part about making contact with the volleyball is that you do so with your hitting arm fully extended. Do this by striking the volleyball at its highest point. Not only does this create a better angle on your jump serve, but it also limits mishits.
Contact the middle/top of the volleyball with an open hand and snap your wrist to create additional topspin. If you fail to snap your wrist, you may end up sending the ball well past the opposing team’s end line, therefore, losing the point.
Follow Through
If you’re around any sport long enough, you’re bound to hear the phrase “follow through” at some point or another. Following through is vital to the completion of almost every single athletic movement in almost every single sport that you can think of. Not only will it help you get the results that you’re looking for but it is also a great way to prevent injury!
As mentioned above, you’ll want to make sure you snap your wrist as your making contact with the volleyball. USA Volleyball player Danny Kinda always says, “Don’t be afraid to show the snap!” in an effort to overemphasize this part of the process. While snapping your wrist is crucial, it doesn’t mean you’re done with your swing.
Continue your arm swing well after contact and let it slow down naturally. You might be thinking, “why does this matter? What would happen if I just stopped my arm swing after I hit the volleyball?”.
For starters, the follow through pairs with the wrist snap to help make sure you don’t sail the serve out of bounds. In addition, it will ensure your serve is getting the full extent of your power. If you stop right at the point of attack, you’ll most likely take a great deal of force away from the ball. Since that force isn’t applied, the ball isn’t going to have the same velocity and the spin is going to be less effective (meaning the ball won’t dive like it should).
From an injury standpoint, there’s a lot to be aware of. Stopping after contact means you’re actively using your muscles to slow down the momentum of your arm. This can have negative impacts on your rotator cuffs and lead to unnecessary tendinitis down the line. Do yourself a favor and finish your swing. Then the last thing you need to worry about is getting ready to play defense!
Ivan Zaytsev Jump Serve Video
If you’re anything like me, then you probably learn best from watching others. Take a look at the video below. It shows opposite hitter Ivan Zaytsev jump serving for four aces in a row. Ivan, nicknamed “The King”, has been one of the best opposite hitters of the 2010s.
Standing at 6’8″, there’s no question that Ivan makes contact with the ball at a height well above the net. The downward angle paired with his incredible strength makes for a serve that can be near impossible to pass.
The reason why I love this video so much is because of the different camera angles. Not only can you see the proper jump serving technique, but you can also take note of the flight of the volleyball. Ivan’s powerful wrist snap enables him to make the volleyball dive once it makes its way over the net.
You may also notice that his toss is quite high and his approach is quite long. Don’t worry if your jump serve looks a whole heck of a lot different. That type of execution comes from years and years of intense training so it’s something you can aspire to!
Frequently Asked Questions About the Jump Serve
If you’re new to volleyball, you should probably focus on a standing serve but its never to early to expose yourself to new techniques. Below are some of the questions that we have received upon writing this article. Feel free to let us know if we forgot any because we’d be happy to help you out!
What are the different types of serves in volleyball?
There are four different types of serves in volleyball. The underhand serve (often seen in recreational volleyball), the topspin serve (can be done from a standing position or as a jump serve), the float serve (a knuckleball-like serve that has no rotation), and the jump serve (can be a jump float or jump topspin serve). Take a look below to get a better idea of what each type of serve entails!
Do you need to be tall to be a good jump server?
No, but it helps. Taller players have an advantage because they can create a more downward sloping angle with their jump serves. Making contact with ball at a higher point means the player needs to rely less on their wrist snap to get the ball in play.
With that being said, you don’t need to be tall to have an effective jump serve. There are many short volleyball players with great jump serves because of something they do to impact the flight of the ball. This can be anything from a strong wrist snap to serving to the opposite corner, therefore, elongating the distance of the court.
Another great option for shorter players is working on your vertical jump. Do your best to increase your vertical so that you are making contact with the ball above the height of the net. Remember, the opposing team cannot block your serve so it doesn’t matter if it barely gets over the net!
Is a jump serve better than a float serve?
Both types of serves have their pros and cons. The float serve moves through the air with no spin (like a knuckleball in baseball) making it very difficult to predict. Because of this, they tend to drop quickly which could definitely result in some aces.
From the server’s perspective, they’re easier to master and therefore the more consistent option. In terms of cons, they are slower thus giving players more time to react. Passers are often told to attack the float serve with an overhand pass which limits its effectiveness.
Jump serves, on the other hand, are rooted in power. They are much quicker moving and require catlike reflexes by the passer. While they may lead to more aces, they usually have a much higher service error rate. All in all, both are great options and their effectiveness is extremely situational.
What is a jump float serve in volleyball?
The jump float serve in volleyball is similar to the standing float serve, but instead requires an approach. Players take an approach similar to a spike and jump from beyond the end line. Their momentum carries them onto the court while the ball is sent over the net. When making contact, aim for the middle of the volleyball with a tight, flat hand. This is the most important part because this is what makes the ball tumble like a knuckleball.
Because the player makes contact with the ball at a higher point, the serve is much “flatter”. This means it doesn’t have an arch and therefore is more difficult to pass. Because the height is level to the net, passers have less time to react which is why it’s so effective. Once you get comfortable serving the ball in play, change your trajectory and distance so you can keep the opposing defense guessing!
What is a topspin serve in volleyball?
A topspin serve in volleyball is quite simply, a serve that has topspin. This means that the ball is rotating forward as it goes from one side of the volleyball court to the other. The objective of a topspin serve is to create a downward curve, or drop, so the volleyball lands in on the opposing side of the court.
Most jump serves have topspin (unless they are a jump float) so they can be considered a “topspin serve.” Topspin serves can also be utilized from the standing position. You can accomplish this by making sure to snap your wrist as much as possible at impact. The wrist snap is what will create the topspin as the impact propels the volleyball forward.